Friday, December 13, 2013

Cupcake Cutie Card Holder


I needed to make a gift for my son's teacher for Christmas and I couldn't think of anything cutie than this cupcake gift card holder.  It was actually simple to make and made such a great presentation.  I loved it. 

 
Here's a picture of the gift card slipped out of the center of the cupcake.  There are plenty of tutorials for this type of project online if you would like to make one for yourself.  Have a great weekend and happy crafting.

Wednesday, December 11, 2013

30 Days of Xyron


I love holiday cards and making your own is always fun.  To add a bit of a kick to mine I'm all into dimension and  Xyron makes it so easy.  Today I'm going to show you how to make your own thick foam tape to make any card POP!


First you'll want to get an extra thick sheet of foam from your local scrapbook store.  I'm using my 5" Creative Station with my foam tape today.  It's going to be thick to work through your machine so go slowly, a little a time.  

  
Once you've run it through once.  Remove your clear top cover and then press the white backing down by rubbing your finger or even a bone folder over it.  Cut the excess white backing away and rerun your foam square through flipped upside down, so the white back will be on the other side.  

Again cut away the excess white backing after rubbing it down.  TIP:  I generally cut small squares like 4" x 4" to cover at a time and use them up so they'll stay neat and fresh. 


Once you have your foam coated on both sides with you Xyron glue cut your squares away with non stick scissors.  Easy Peasy!!!  You can really see below how the extra thick foam tape gives a unique twist to any card or project. 


My adorable little Christmas mouse friend is from a stamp set from Crafters Companion called " Christmas Seasons" .  Not only did the mouse stamp come from the set but so did the Merry Christmas sentiment that is attached to the bow.  The paper collection is from Heidi Swap's Christmas Collection " Believe". 

Want to know everything I used on this project?  Check out my supply list below and I hope you continue to enjoy the celebration of the holidays with Xyron


Other Products:Foam Sheet,  KaiserCraft Pearls, Stick Pins, Copics and Ribbon

Sweet Memories With You


I love the elegance of Heartfelt Creations projects.  It's so easy to accomplish with their papers, dies and stamps.  This card is one I created using the Floral Key Collection.  Please see below all the products used and step by step directions for creating one of these cards for yourself. 


Heartfelt Creations Products Used:
HCD 741 Burnished Key Die
HCPC 3572 Floral Keys and Locket
HCDP1 237 Floral Key Paper Collection
HCD 737 Ornate Gateway Die
159723 Dries Clear Glue

Other Products Used: Ribbon, Pearl, Dimension Foam Tape, Black Ink

Directions: Cut decorate panel out from paper and mount on 5 x7" base card.  Cut smaller panel and mount on base as shown with foam tape.  Cut two flourishes out from Ornate Gateway die and center in the middle of the card and glue down with Dries Clear Glue. Cut deco style panel and mount on top of the flourishes as shown with foam tape.  Fussy cut the lock and roses out from the paper and mount. Wrap a ribbon around the bottom of the card and top with a bow.  Stamp with black ink your key from the Floral Key and Locket set and cut out with matching Burnished Die.  Cut your key in two and weave through the knot of the ribbon.  Finish off the card and the ribbon with a pearl brad. 

Monday, December 9, 2013

Background Tutorial with KaiserCraft


Today I've got a great tutorial for you that will come in so handy for any project, mixed media, scrapbooking or cards...super easy and super cool. 


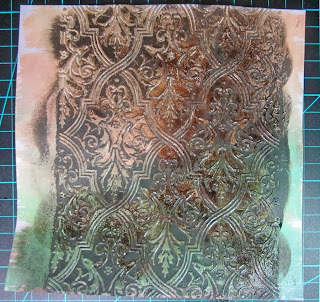
First step is pick some designer paper that has some color variation throughout.  I've used a sheet from the latest collection from Kaisercraft, Paradisco .  Using an embossing folder emboss your sheet of paper.

 
Next you want to cover the high areas of the paper with versa mark ink. 
 
 
Cover with fine clear embossing powder and heat seat.  Do this 2-3 times to build up a good base. 
 
 
Next you want to take a dark color of ink and sponge dauber onto the paper.  This is really going to make it pop. 
 
 
Once it's covered very good wipe away any excess with a baby wipe.
 
 
Isn't this beautiful.  Now it's ready to use in a project.  You'll find pictures of my project below and I think you'll agree it gives great depth and texture to your work.