Showing posts with label Xyron. Show all posts

Monday, July 14, 2014

Simples Stories, May Arts Ribbon and Xyron come together : Blog Hop


Hello everyone...today kicks off the amazing week of Simple Stories, May Arts Ribbon and Xyron all joining together for one fantastic blog hop.  Be sure to hop to all the designers blogs and see some great projects through out the week. 
 
Today I've got a tutorial for you that will show you how to make this door hanger sign.  I love this phrase so when I saw it in the Simple Stories " The Story of Us "  I knew I wanted to make a sign for my bedroom door. 


The ribbon I used  is wire rimmed gold ribbon from May Arts and it's beautiful and just the perfect touch. 
 
Check out the complete tutorial on Snapguide. 


Need to know what products I used on this project...find them here


Monday, June 30, 2014

Xyron and Lawn Fawn Blog Hop

 
This week we are kicking off a great HOP with Xyron Glues and Lawn Fawn Stamps.   All of their stamps are just adorable and you'll be able to see all kinds of ideas from the two design teams.  So be sure to hop all week long.
 
My card is one I created using the " You've Got Mail" stamp set and some Graphic 45 "By the Sea" paper.  I thought the colors were perfect since we are right here at Fourth of July. 


I stamped and fussy cut out the images so make it be super 3-D.  The little letter looks likes it's dropping in the box as we speak. 

 
Want to know all the goodies used from Xyron and Lawn Fawn to make this adorable card...check out the list below. 
 

Tuesday, June 17, 2014

Xyron and Craftwell Blog Hop


Today I'm thrilled to be jumping into the fun with Xyron and Craftwell's Blog Hop.   
 
I've made this adorable letter holder that is adorned with metal embossed flowers...and it was super easy with the help of Xyron and Craftwell embossing folders.  I created an easy tutorial that will show you how to make this flowers in a snap. 
 
 
HERE IS THE COMPLETE TUTORIAL


Be sure to see all the creations from the rest of the Xyron team on the Xyron Blog or Craftwell's Design Team on Craftwell's Facebook page.
 
Here is a complete list of the Xyron and Craftwell products used to make everything easy for you


Thursday, May 29, 2014

Quick Quotes and Xyron Design Team Blog Hop


Today I'm helping to continue on the fun for the week long Xyron and Quick Quotes Blog Hop.  I had so much fun playing in their paper! Be sure to go to Xyron Blog to see more projects from the design team and also check out Quick Quotes for even more inspiration. 

Today I've made a 12 x 12 layout using the Serendipity paper collection from Quick Quotes.  I had some photos of my brave little man at the Urgent Care getting a stitch in his lip.  He was so brave, so when I saw the quote "Life Takes Bravery" I knew it was a perfect pairing. 


On a side note....my son's lip is healing up nicely so Everything is going to be OK, LOL.  Be sure to see all the Xyron and Quick Quotes products used for this project below and thanks so much for stopping by. 


Monday, May 19, 2014

Xyron and Paper House Blog Hop With Tutorial


Hi Everyone.  Today we are kicking off the PaperHouse and Xyron Design Team Blog Hops.  I've created a tutorial that is simple and fun but will have you making this adorable box in no time.  Ready to see how to upcycle a Laughing Cow Cheese Box...Wow lets start.     

Step One

Trace the top of the lid onto your paper (twice).  I'm using the Endless Summer Paper from Paper House.  Cut out your circles. 

Step Two


Using the 5" Creative Station run your traced circles through and adhere one to the top of your box and put the other one aside.

Step 3


Sand the box edges and ink for a finished look.
 
Step Four
 
Cut 1/2 inch strips (3) and ink the edges.  Run through the 1" Teresa Collins Xyron Sticker Maker and attach to the sides of the box.  You'll do this on the top of the box and also the bottom of the box and will use the third strip to finish off both as 12" won't take it all the way around the box. 
 
 
Step Five : Cut two strips of 3/4 inch strip, ink and run through the 3" disposable Xyron Create a Sticker 


 Adhere to Around the inside of the box. Add interior circle we had set aside from step one/ two  to the inside bottom of the box .  Add embellishments to finish off project.


Here is a complete list of Paper House and Xyron projects used to create this piece.  Be sure to check out the rest of the design teams projects for more great tutorials, tips and inspiration all week long. 


Friday, May 2, 2014

Paper Smooches meets Xyron


This week has been so much fun as Xyron and Paper Smooches joined forces to show some beautiful creative projects.

 I thought I would create a gift box adorned with an adorable monkey from the Smoocheroos Stamp Set. I colored the monkey and then popped him up with some foam tape made with my Creative Station. 


The top is adorned with a handmade festive flower...it added that extra little pop that was needed. 

Be sure to check out the rest of the design teams projects for the week.....they're sure to spark your creative juices.   Here's a recipe of the products used and links to where you can get yours. 


Monday, April 21, 2014

Teresa Collins and Xyron Tutorial


Hi Everyone.  This week Xyron and Teresa Collins are joining forces to bring you some amazing projects and products.  I've got a really simple but fun tutorial for you that will show you how to make this quilt pattern card.  So away we go. 
 
 
First I'm using "You are my Happy" paper collection from Teresa Collins.  I've cut a 6 x 6 base and then four squares of 2 1/2 x 2 1/2 and four squares of 1 1/2 x 1 1/2. 


Next your going to use a corner rounder and round only of the edges on opposite sides as shown.  I then inked my edges of all the squares with distress ink. 


Cut four more squares of plain cardstock at 2 3/4 x 2 3/4 and also four more 1 3/4 x 1 3/4".  Round the corners as you did the patterned paper and also ink the edges again. Run your squares through your Xyron 5" Creative Station.  Adhere your patterned squares onto each other for a layered look. 

 
Using the Xyron/Teresa Collins Adhesive Remover clean up the edges of your squares.  This little tool is amazing for getting up little bits of glue...lifesaver!!!!


Using the foam squares from the Xyron/Teresa Collins Adhesive kit layer your card together.


Punch out two circles one a bit larger than the other and ink the edges run your smaller circle through you Xyron 3" Disposable Sticker Maker.  Layer together and attach with a foam square to the center of your card to finish up. 


I love all the layer and depth in this card.  It's simple but stunning at the same time.  Be sure to go to Xyron's Blog and see all the other beautiful creations that will be made this week. 
 
Products Used
Teresa Collins Adhesive Kit
3" Disposable Sticker Maker
5" Creative Station
Teresa Collins " You are Happy" paper collection

Wednesday, March 26, 2014

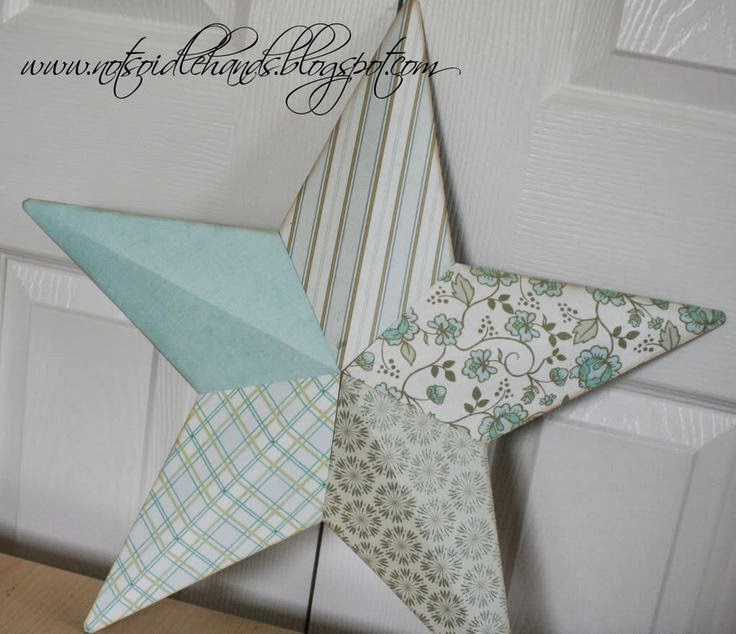
Should have been Xyron .....but now it is / Barn Star Tutorial.


This whole week Xyron has been featuring projects that should have been made with Xyron but weren't.  We want to show you how easy Xyron could and will make these projects....here is a picture and link to the project that inspired my beach themed star. 

http://www.pinterest.com/pin/74872412526558188/


Today I've got a tutorial for you that your Xyron products are going to help make super simple.  Create a 3-D star adorned with your favorite motif.  On my star I used Graphic 45's latest collection " By the Sea" and finished it off with cut outs of seashells and rosettes.  Perfect for the beach house  So what to see how simple it is????? Take a peek. 


Step one: pick up a plain 3-D star at your local craft shop.  Use a piece of copier paper and lay over the star.  Using your bone folder, crease the outline of the star shape.  This is going to create a template for you to use.


 Step Two: Cut your shape out of the paper and then use as template on your designer card stock  I drew in pencil around my shape.  Cut out the pattern and do this on five different patterned paper. 


Step 3: Pronounce your center crease with a bone folder for a crisp edge.


Step 4: Run through your 5" Creative Station, then attach onto your star.


Step 5: Finish off all five of your shoots on the star as shown and then top with whatever embellishments you would like.  Take a look at my finish star close up....


Here's a complete list of Xyron goodies used on this project:


Tuesday, March 18, 2014

Sneak Peek of New Anna Griffin Release with Xyron


I'm so excited to be sharing a sneak peek of some of Anna Griffin's latest collections that will be airing on 24 hours of Crafts on HSN, March 24th.  Xyron and Anna Griffin have joined forces and over the next week you can find all kinds of sneak peeks through Xyron's Blog.  Be sure to tune into HSN on the 24th where of course Beth Kingston will be featuring Xyron and Anna Griffin will be offering all her new collections...and they are beautiful. 


Anna Griffins has some beautifully detailed die cuts and they go hand in hand with the Teresa Collins Xyron Foam Squares.  Together they really can make your cards pop.  The die cuts also work wonderfully with the Xyron Creative Stations and making them into stickers.  Really the two are made for each other. 


Here are all the Xyron goodies I used to create this masculine easel card. 


Wednesday, January 22, 2014

Mixed Media Bird Album Tutorial


Hi everyone today I have a mixed media tutorial for you using Xyron Products and making this mini bird album.  Get you Xyron goodies out and let's go. 


This is a great way to use left over chipboard letters and numbers.  Gather your scraps together along with a base chipboard album cover. 

Run your chipboard numbers through the disposable create a sticker 3".  Press around the top clear sheet with a pencil or your fingertip and then peel of the clear sheet...Boom you have a sticker. 
 
 
Randomly place your letter/numbers on the base of the chipboard album. 


Using an X-acto tool trim the edges off of all the numbers. 
 
 
Paint a thin coat of white paint over the entire surface
 
Using two different colors of colored spray mist, mist your entire cover and let dry.  You can use a heat gun to set more quickly if you want. 
 
 
Rub Versa Mark Ink on highlights of your album and cover with embossing powder that coordinates with your spray colors.  I used Iced Enamels Turquoise because I like all the mixed colors that are speckled throughout.  It adds a lot more interest. 
 
Use a pearl pen to highlight in the grooves of you chipboard stickers.  Run a paint brush over the pearl paint after you apply to blend in.  Ink your edges with a brown ink, I used Tim Holtz Vintage Photo. 
 
 
Here is the really neat technique.  Take the Teresa Collins Clear Hold Adhesive and cover all the numbers with a light coat.  If you leave to dry naturally it would be smooth, but we want to add texture.  Using a heat gun dry the glue.  It will bubble and pop but still add a great glossy texture to the top of all your numbers.  It's so cool. 
 
Be sure to use your Creative Station 9" or 5" (depending on the size of your book) to cover all the remaining pages of your mini album.  It will make it a snap. 
 
Here is a close up of the finish look
 
Need Xyron?  Check out the supply list below and stock up on yours today.