Monday, January 6, 2014

Masculine Card with Garage Days by KaiserCraft


KaiserCraft had a super cute Father's paper collection a few months back called Garage Days.  I loved the vintage shabby feel of the collection.  This is a card I created in no time by stacking collectables and a doing a little hand doodling.  Threw a few flowers on to finish it up and I had this adorable Father's card done so quick.


Wednesday, January 1, 2014

Happy New Year with Hearfelt Creations


Happy New Year everyone.  I have so enjoyed spending some time with my family and boys during this holidays season but I have to admit I'm ready to get back on a normal schedule including my blog...so next week things should be back to normal.  Whew.
 
Today's card is one I created for Heartfelt Creations and as always I love the way everything Heartfelt comes together from the stamping, dies and even the paper.  It makes crafting so easy. .
 
Please see below all the supplies I used for this project and also directions if you would like to make your own. 
 
I hope everyone is showered with blessings in 2014 and I'll see you next week. 
 
 
Products Used:
HCPC 3573 Burnished Key Hole PreCut Set
HCPC 3532 Beautiful You PreCut Set
HCPC 3500 Open Vintage Floret PreCut Set
HCPC 3502 Mini Vintage Floret PreCut Set
HCDP1 238 Floral Key Paper Collection
HCD 727 Vintage Floret Die
HCD 732 Decorative Flower Pot Die
354806 Standard Circle Large
159223 Paper Blossoms Molding Mat
459222 Paper Blossoms Tool Kit

Project Instructions:
Other products: KaiserCraft Pearl Strips, Foam Tape, Pan Pastels, Distress Ink

Instructions: Cut solid designer paper 6 x 6". Cut designer paper panel 5 3/4" x 5 3/4" and mount to the base. Adorn the edges with the pearl stips. Cut smaller square designer paper and mount on same color solid designer paper and mount in the center with foam tape. Cut designer paper panel/strip and mount with solid designer paper and outline with the pearls. Cut three lace panels from the Flower Pot die and line along the two edges of the strip as shown. Mount down the center with foam tape. Hand cut the oval picture from paper collection and mount with foam tape in the center. Stamp sentiment on paper with distress ink and cut out with circle die. Line the edge with the pearls and mount to the side as shown with foam tape. Stamp multiple sizes of the four smallest stamps from the vintage floret. Cut out with matching dies. I cut 16 different petals to acheive the flowers I made. Using pan pastels use a dark purple in the center of the flower and the edges with a soft pink. Once all the petals are colored ink the edges and lightly over the top of all petals with distress ink in vintage photo color. Use the McGill tools to cup the petals and stack as show to create the flowers. You can also fold with your fingers each petal once you have cupped with the McGill tools to add a bit more movement to your flowers. Stamp the leaf flourish from Beautiful You and cut out with matching die. Use two shades of green pan pastels and color yourleaves. Make your edges a darker green and have a lighter green for the centers. Once colored ink the edges with the vintage photo ink. Cup your leaves with the McGill tools and attach in the right lower corner of you card. Add your finished flowers as shown to finish the card.

Thursday, December 26, 2013

My Wish For You Card with Heartfelt Creations


I hope everyone had a blessed Christmas.  Well I told you this week would be slight on posts but here is one that I hope is worth not having so many just for this one.  The handmade flowers really pull everything together on this card and using Heartfelt Creations make handmade flowers so easy. 


Here are all the supplies and directions on making this card.  See you next week!!!! and craft on.

Products Used:
HCDP1 238 Floral Key Paper Collection
HCPC3572 Floral Keys and Locket
HCD 741 Burnished Key Die
HCD 728 Timeless Armour
HCD 713 Decorative Lace Border
HCD 727 Vintage Floret Die
HCPC 3500 Open Vintage Floret
HCPC 3502 Mini Vintage Floret

Other Products Used: Viva Decor Liquid Pearls, Card stock, Distress Ink, foam tape

Directions:
Cut a base card 5 x 7".  Cut decorative paper 6 3/4 x 4 3/4" and attach to base card.  Die cut lace border twice in decorative paper and attach to the base card, trim overlapping edges. Apply a small pearl dot in all the cut out squares in the top of the lace border as shown on card and let dry.  Cut corners of decorative paper and mount with glue on cardstock, cut out corners so there is a slight edge of the cardstock and then mount on base card.  Cut two flourishes from the Timeless Armour collection out of white card stock.  Ink edges.  Hand cut out decorative oval and frame with the flourish  Mount on card with foam tape. Ink Floral Key and Locket stamp with multiple color ink and stamp on card stock.  Cut out with matching die.  Mount onto oval as shown and add liquid pearls around the oval scroll.  Stamp and cut out 12 varying size flowers.  Ink the edges.  Curl the petals with a pair of tweezers.  I accordion fold them, glue them together to make three flowers as shown and attach to the card to complete. 

Friday, December 20, 2013

Laugh Kaisercraft Layout


With the holidays coming up next week the month is almost over...YIKES!!!! Where did 2013 go?  I can't think of a better way to show out the year than by winning KaiserCrafts monthly sketch challenge....


This is my take on one of our sketches this month for KasierCraft.  Sketches can really jump start your creative mojo and a great way top win some extra product.  Be sure to hop on over to KaiserCraft's Blog and see all the sketches so far this month and join in our fun...and best of luck. 

I'll be taking a bit of time off next week, so you may only see one post for Heartfelt Creations and that's it.  I hope you are all blessed this Christmas and I'll see you next week and a lot more in 2014. 

Wednesday, December 18, 2013

A Prayer for the Day

I really love this sentiment from the new Floral Key Collection from Heartfelt Creations so of course I had to feature it on a card.  Really you only need one flower on a card to make it pop and that's just what I did on this one 

 
 I added a little surprise on the inside and a place where you could write your personal message.  All in all this card came together beautifully..  It's always simple to create such elegance with Heartfelt.  Want to know how I made this?  See all the products and step by step directions below. 


HCDP1 328 Floral Key Paper Collection
HCPC 3576 A Prayer for the Day
HCPC 3573 Burnished Key Hole
HCPC 3545  Open Leaf
HCD 736 Classic Leaf Die
HCD 722 Tattered Blossoms Die
HCPC 3468 Tattered Blossoms

Other Products Used: Rhinestone Bling, Distress Ink, Distress Markers, McGill Tools, Embossing Powder


Directions for Project:

Cut panel from designer card stock.  Stamp with brown distress ink sentiment and heat set with clear embossing powder.  Mount on solid base and sand the edges for a distressed look.  Stamp 7 flowers in varying sizes and cut out with matching die.  Color your petals with ink and manipulate petals with McGill Tools.  Stack your petals and glue together to for a large blossom.  Paint the tips of your flower with glitter paint and finish off your flower with a sparkly bauble.  Stamp two leaves on cream color card stock, cut out with matching die and curl your leaves with McGill Tools.  Ink lightly your edges of the leaves and rub inward leaving some of the cream showing.  Attach leaves and flowers to card as shown.  For the inside of the card cut cream color card stock and stamp image in the lower right hand corner of the card with the image slightly off the card.  Color with markers of your choice.  Glue to the interior for a finished project.

Tuesday, December 17, 2013

30 Days of Xyron Christmas Tag and Tutorial


Tags are such a popular, fun and easy thing to make at the holidays.  This is one that is great because you can use up some scraps you might have left over from other Christmas projects.  I have a really simple tutorial today for you that will show you how to make this adorable tag in no time.


First step is to cut strips making each one a bit longer that the last.  Take each strip and cigar roll it.  I use the end of one of my files for a base, but you could use any tool you have on hand. 


Once you have your rolls completed.  Use Xyron's new high tack tape to adhere your rolls to the base tag.   I like to place the tape over the end of the roll.  This helps to keep the rolls tight and glue them down. 


Then it's just decoration your tag/card with a few finishing touches and it's ready to go on a package. 

 
Here's a complete list of all the goodies I used to create this card
 
 
Other Products Used: Ribbon


Friday, December 13, 2013

Cupcake Cutie Card Holder


I needed to make a gift for my son's teacher for Christmas and I couldn't think of anything cutie than this cupcake gift card holder.  It was actually simple to make and made such a great presentation.  I loved it. 

 
Here's a picture of the gift card slipped out of the center of the cupcake.  There are plenty of tutorials for this type of project online if you would like to make one for yourself.  Have a great weekend and happy crafting.

Wednesday, December 11, 2013

30 Days of Xyron


I love holiday cards and making your own is always fun.  To add a bit of a kick to mine I'm all into dimension and  Xyron makes it so easy.  Today I'm going to show you how to make your own thick foam tape to make any card POP!


First you'll want to get an extra thick sheet of foam from your local scrapbook store.  I'm using my 5" Creative Station with my foam tape today.  It's going to be thick to work through your machine so go slowly, a little a time.  

  
Once you've run it through once.  Remove your clear top cover and then press the white backing down by rubbing your finger or even a bone folder over it.  Cut the excess white backing away and rerun your foam square through flipped upside down, so the white back will be on the other side.  

Again cut away the excess white backing after rubbing it down.  TIP:  I generally cut small squares like 4" x 4" to cover at a time and use them up so they'll stay neat and fresh. 


Once you have your foam coated on both sides with you Xyron glue cut your squares away with non stick scissors.  Easy Peasy!!!  You can really see below how the extra thick foam tape gives a unique twist to any card or project. 


My adorable little Christmas mouse friend is from a stamp set from Crafters Companion called " Christmas Seasons" .  Not only did the mouse stamp come from the set but so did the Merry Christmas sentiment that is attached to the bow.  The paper collection is from Heidi Swap's Christmas Collection " Believe". 

Want to know everything I used on this project?  Check out my supply list below and I hope you continue to enjoy the celebration of the holidays with Xyron


Other Products:Foam Sheet,  KaiserCraft Pearls, Stick Pins, Copics and Ribbon

Sweet Memories With You


I love the elegance of Heartfelt Creations projects.  It's so easy to accomplish with their papers, dies and stamps.  This card is one I created using the Floral Key Collection.  Please see below all the products used and step by step directions for creating one of these cards for yourself. 


Heartfelt Creations Products Used:
HCD 741 Burnished Key Die
HCPC 3572 Floral Keys and Locket
HCDP1 237 Floral Key Paper Collection
HCD 737 Ornate Gateway Die
159723 Dries Clear Glue

Other Products Used: Ribbon, Pearl, Dimension Foam Tape, Black Ink

Directions: Cut decorate panel out from paper and mount on 5 x7" base card.  Cut smaller panel and mount on base as shown with foam tape.  Cut two flourishes out from Ornate Gateway die and center in the middle of the card and glue down with Dries Clear Glue. Cut deco style panel and mount on top of the flourishes as shown with foam tape.  Fussy cut the lock and roses out from the paper and mount. Wrap a ribbon around the bottom of the card and top with a bow.  Stamp with black ink your key from the Floral Key and Locket set and cut out with matching Burnished Die.  Cut your key in two and weave through the knot of the ribbon.  Finish off the card and the ribbon with a pearl brad. 

Monday, December 9, 2013

Background Tutorial with KaiserCraft


Today I've got a great tutorial for you that will come in so handy for any project, mixed media, scrapbooking or cards...super easy and super cool. 


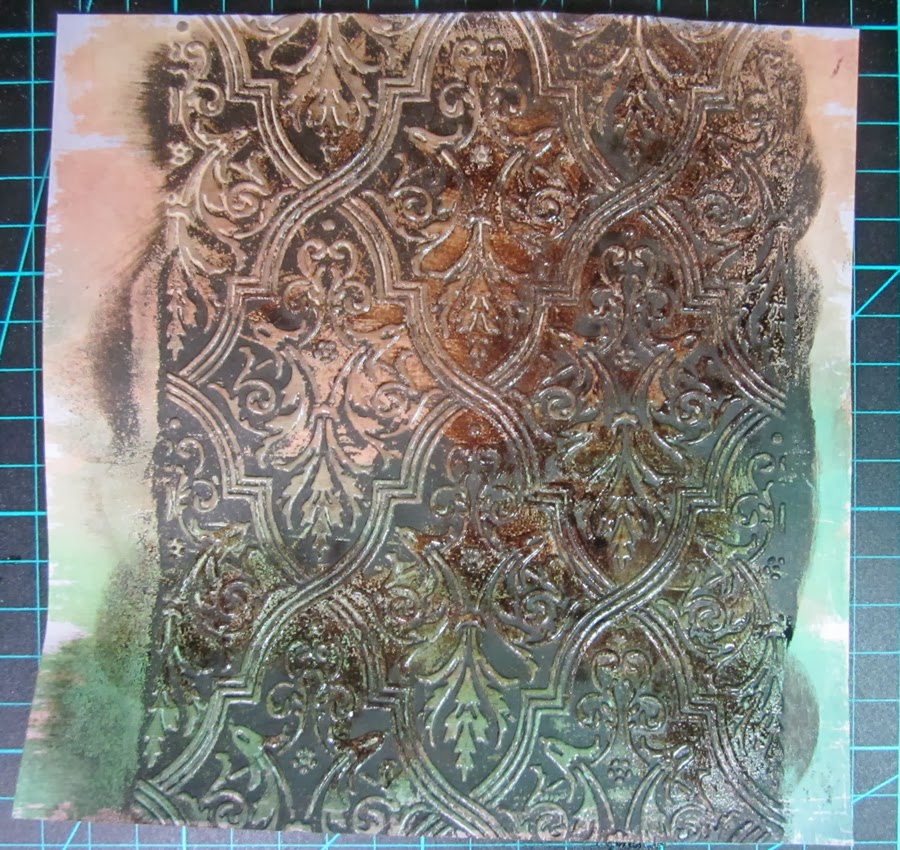
First step is pick some designer paper that has some color variation throughout.  I've used a sheet from the latest collection from Kaisercraft, Paradisco .  Using an embossing folder emboss your sheet of paper.

 
Next you want to cover the high areas of the paper with versa mark ink. 
 
 
Cover with fine clear embossing powder and heat seat.  Do this 2-3 times to build up a good base. 
 
 
Next you want to take a dark color of ink and sponge dauber onto the paper.  This is really going to make it pop. 
 
 
Once it's covered very good wipe away any excess with a baby wipe.
 
 
Isn't this beautiful.  Now it's ready to use in a project.  You'll find pictures of my project below and I think you'll agree it gives great depth and texture to your work.