Friday, January 31, 2014

Teresa Collins Altered Box


I was thrilledwhen my altered Teresa Collins box was on HSN with Xyron and Beth Kingston back in January.  Here is a picture of the Teresa Collins Kit you can get on HSN or on Xyron website, click here. The pink box that all the goodies come in can be altered to create something as beautiful as this.  AMAZING!!!

http://www.xyron.com/enUS/Products/Teresa_Collins_Products/Teresa_Collins_Products/Teresa_Collins_Adhesive_Kit.html
 
The flowers and paper are of course from Heartfelt Creations...I just love the way this turned out.  I was able to use the liquid glue that come in the kit to gloss coat all of the flowers.  Of course the Creative Station made adhering my base paper a snap and I love the foam adhesive squares that come in the TC Kit also.  They are black so they really blend in and you can see them even if you are flipping the box around. 
 
Here is a detailed shot of the flowers and layering. 


I'd love to see your altered box...send me a picture and happy creating. 


Washi Tape Flowers Tutorial


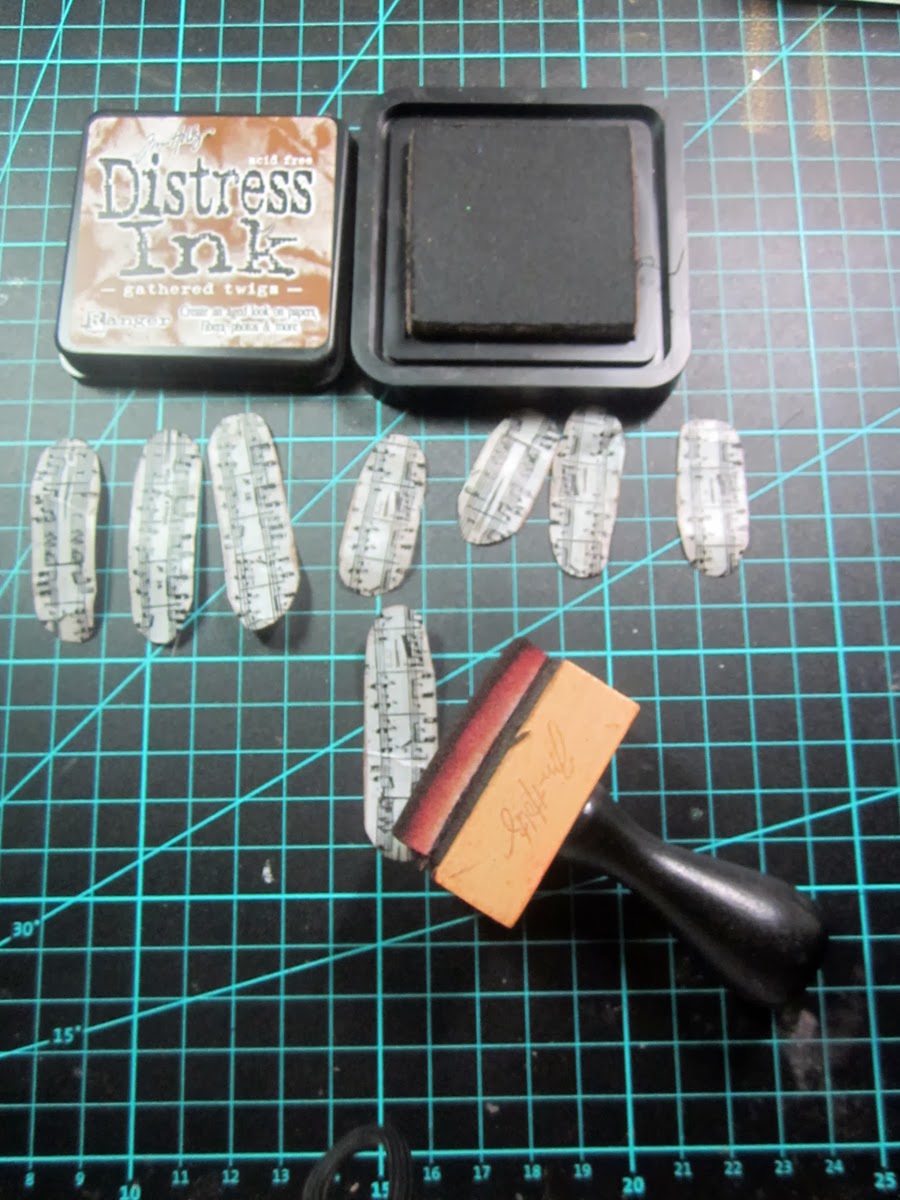
Hello everyone, I'm excited to share a super simple tutorial with you today making washi tape/ printed tape flowers.  They are so easy...... here are the supplies you'll need to gather.

 
Step 1: Fold over the printed tape so both sides have the pattern.

Step 2: Cut strips into a pill shape, rounding off the ends. 
 
Step 3: Ink the edges front and back of each petal

Step Four: pinch the centers together with tweezers for a crisp pinch.

Step Five: Twist where you have the pinch, but be careful not to rip your tape.  The pinch in the center actually helps the tape not to rip.
 

Step Six: Using glue does layer your petals up to create a flower.

Step Seven: Finish off your flower with either a paper bloom or even a sparklet. 
 

Here’s a completed card that I used the latest collection “ Art of Life “ which blended beautifully with the printed tape flowers. 

KaiserCraft supplies used: P1405 Printed Tape, F666 Black Paper Blooms, F661 Mini Black Paper Blooms, P1407 Loved,  Foam Tape

Other Products Used: glue dots, ink, card stock, tweezers


Wednesday, January 29, 2014

Song in My Heart with Heartfelt Creations

Today's card uses the latest collection from Heartfelt Creations " Majestic Morning" .  I love all the bright color combinations of this collection and the new flowers stamps with coordinating dies are a must have.  Be sure to see the rest of the design teams creations this week using Majestic Morning and other current collections on Heartfelt's Blog along with step by step tutorials for each project. 

Friday, January 24, 2014

Glitter Bling Flower Tutorial with KaiserCraft and Xyron


Today I've got a great little tip/trick/tutorial for some blinged out flowers.  
 
 
Step 1: Run a paper bloom through a 3" Create a Sticker by Xyron.  This will coat the entire flower with adhesive.
 
 
Step 2: Rub the flower well and then remove the top clear layer.  You can run your finger over the flower now and rub off any excess glue. 
 
 
Step 3: Coat the adhesive side of the flower with a fine glitter.
 
 
Step 4: Use a sharp pointed pair of tweezers and scrap off some of the glitter in a pattern.  I just used lines down each of the petals. The paper blooms softness and the Xyron glue work great together for manipulation.
 
 
Step 5: Create several various sizes and stack together to create a full flashy flower.  Top the center off with a Sparklet. 


Here is my oversized tag I created adorned with my sparkly flowers.
 
 
Here is a complete list of all the products I used for this piece
 
Kaisercraft Products: Violet Crush Collection: SB705 Lilac, CT782 Collectables, P412 Dainty, P1413 Mallow, F613 Violet Rhinestones, F1410 Plum Flowers, RS408 Sparklets/Crystal.
 
Other Products Used: Dies, Tweezers, Glitter, Xyron 3" Disposable Create a Sticker, Foam Tape, Ink, Tag
 

Wednesday, January 22, 2014

Mixed Media Bird Album Tutorial


Hi everyone today I have a mixed media tutorial for you using Xyron Products and making this mini bird album.  Get you Xyron goodies out and let's go. 


This is a great way to use left over chipboard letters and numbers.  Gather your scraps together along with a base chipboard album cover. 

Run your chipboard numbers through the disposable create a sticker 3".  Press around the top clear sheet with a pencil or your fingertip and then peel of the clear sheet...Boom you have a sticker. 
 
 
Randomly place your letter/numbers on the base of the chipboard album. 


Using an X-acto tool trim the edges off of all the numbers. 
 
 
Paint a thin coat of white paint over the entire surface
 
Using two different colors of colored spray mist, mist your entire cover and let dry.  You can use a heat gun to set more quickly if you want. 
 
 
Rub Versa Mark Ink on highlights of your album and cover with embossing powder that coordinates with your spray colors.  I used Iced Enamels Turquoise because I like all the mixed colors that are speckled throughout.  It adds a lot more interest. 
 
Use a pearl pen to highlight in the grooves of you chipboard stickers.  Run a paint brush over the pearl paint after you apply to blend in.  Ink your edges with a brown ink, I used Tim Holtz Vintage Photo. 
 
 
Here is the really neat technique.  Take the Teresa Collins Clear Hold Adhesive and cover all the numbers with a light coat.  If you leave to dry naturally it would be smooth, but we want to add texture.  Using a heat gun dry the glue.  It will bubble and pop but still add a great glossy texture to the top of all your numbers.  It's so cool. 
 
Be sure to use your Creative Station 9" or 5" (depending on the size of your book) to cover all the remaining pages of your mini album.  It will make it a snap. 
 
Here is a close up of the finish look
 
Need Xyron?  Check out the supply list below and stock up on yours today.


Monday, January 20, 2014

Spring Bloom with KaiserCraft


Happy Monday everybody.  Today's post is a layout I created for KaiserCraft using the latest collection : Spring Bloom.  You know how much I love to nestle my little guy among flowers on my layouts, even boys look great in flowers.  


Have a great week and I'll see you soon. 


Friday, January 17, 2014

Hello Weekend


Here is a card I had creating using Graphic 45's Bohemian Bazaar.  Of course all the flowers are handmade....which you expect me do to anything else.  I love making those flowers.  I thought since we are in the dead of winter a little burst of color and spring this week would make you smile. 

Have a great weekend.  My mission is to get my craft area organized and sorted and ready for a great year.  So off to buy new shelving.  See you next week. 

Wednesday, January 15, 2014

A Burst of Color with Majestic Morning


Today I'm excited to share with you a layout I created for Heartfelt Creations using the latest release Majestic Morning.  All of the flowers are of course handmade and colored.  I think the colors from this picture of my youngest couldn't have been more perfect...Who would have thought these colors and a boys layout. 


Be sure to see all the products and detailed directions on how I made this layout and have creating your own. 

HCDP1 239 Majestic Morning Paper Collection
HCD 742 Majestic Blooms Die
HCPC 3577 Vintage Morning Background
HCPC 3578 Majestic Morning Background
HCD 736 Classic Leaf Die
HCPC 3545 Open Leaf
HCPC 3546 Classic Leaf
HCD 726 Delicate Asters Die
HCPC 3494 Delicate Asters
452255 Grand Calibur 
273900 Zip Dry Glue 
159723 Art Institute Glue-Dries Clear

Other Products Used: Spellbinders Die: Fanciful Lattice, X-acto Tool, Viva Decor Liquid Pearls, Kaisercraft Rhinestones, Inks, Xyron Foam Tape, Card Stock, McGill Flower tools and pad

Directions: Add a dot of liquid pearls to each of the centers of the designer paper as shown.  This add great base texture.  Be sure to let this dry.
Using an X-acto tool fussy cut the just a portion of the sunburst pattern on the base paper.  You will do this for both sunburst patterns top left and bottom right.  Cut panel from designer paper and tuck into the cuts of the sunburst paper as shown and glue with the zip dries.  Layer your panels up and top off with a die cut of the Fanciful Lattice attached with foam tape. Finish off the layers with your photo.  Stamp both the Vintage Morning and the Majestic Morning flowers and cut out with coordinating die.  Color the petals with ink variegating the color with yellow in the centers and pink on the outer edges.  Curl your base petals and layer together with Dries Clear Glue. For the center of your flowers mold up the petals upward and glue together in a loose ball.  This will finish up the center of your Majestic flowers, I left one flower open in the center.  Stamp Delicate Asters with orange ink and cut with matching die. Cover each flower with coordinating ink in a lighter shade. Bend each petal upward with a pair of tweezers and curl some of the end into an arch.  Layer your flowers and glue with the dries clear.  Finish the centers with a rhinestone and then around each rhinestone add a dollop of liquid pearls in a circle as shown and let dry completely.  Stamp various sizes of leaves out and cut with matching die.  Color your leaves with ink.  Curl, bend and twist your leaves using the McGill Flower tools to give them dimension. Cluster your flowers and leaves around your picture as shown.  Finish off the layout with the Memories sentiment cut out and foam taped to the bottom left of the picture.  Cut out two tags and nestle in your flower cluster as shown with the " love tag" and the " Cherish tag". 

Monday, January 13, 2014

The First JustRite Challenge of the Year


After a bit of a holiday break, JustRite has started back their challenges...fun, fun, fun, CLICK HERE TO SEE THE CHALLENGE.  Today I created a card for a friend of mine who recently lost her father.  One thing I'm horrible at, is actually remembering to give out my cards.  I know that's terrible but I generally forget them and have to stop by Hallmark.  One of my goals for this year is to actually share my work.  It's not doing me any good piling up in the house that's for sure. 
 
This card is not quite as layered as my usual work, but I do need to drop this one in the mail.  I gave it a little pop by layering the poppy flowers and foam taping them up.  Of course the button and bow have good bit of depth to them, but hopefully I can stuff them in the envelope, LOL. 
 
 
What to see all the JustRite products I used on this card?  Check out my supply list below. 
 
 Amazing Paper Grace Die
 
See you Wednesday with a beautiful layout for Heartfelt Creations...You'll love it. 


Friday, January 10, 2014

Wishing I was at the beach......


Today I have a quick post for you ..... This is a necklace I made using Ice Resin.  I molded a sea shell and cast with colored Ice Resin enhanced with some glitter flakes.  After the shell had set up but not all the way I ran some sterling sliver wire through the top and added the hardware.  The ribbon necklace finished it off along with a sterling silver handmade clasp. 

Have a great weekend and I'll see you next week!!!!! Keep on crafting.