Wednesday, March 7, 2012

Heartfelt Creations Wednesday


Today I have a card to share with you that I created using the Twining Clematis Stamp set...  It's a simple card but one that I think really highlights the stamp.  The paper is from KaiserCraft These Days Collection.

Be sure to check out the rest of the design team creations on the Heartfelt's blog and also complete directions on how to make all the projects. 

Monday, March 5, 2012

Prickley Pear Monday

Please scroll below to see todays Amazing Mold Putty Post


Happy Monday everyone...it's a Prickley Pear kind of day and I've got this tag to share with you today.  It actually was inspired by my art journal page I created.  Having the art journal lets me explore new technique that I might not try on project...but somehow on the art journal it's OK and it opens new door. 
I covered the tag with some Tim Holtz distress tape and then painted with Gesso.  I then colored the base with various distress ink colors and flicked some water on the surface.   The tag was stamped with gelato paint sticks and also with some distress colored ink. 


Then I just added the stamped birds from the mini birds clear stamp set and die.  It's so nice to be able to add small intricate little stamps that the die makes so easy to work with. 

I hope you like my tag and I'd love to see everyone start an art journal for inspiration.  Hop on over to the PPRS blog and check out the rest of the design teams projects...BEAUTIFUL!!!

Gone Fishing with Amazing Mold Putty

I have had so much fun on Amazing Mold Putty's design team and am sorry to see my term ending, but I know I'll be seeing beautiful projects from the upcoming DT.
For my last project I molded one of my favorite pins and used it as a charm on this card. The bronze powder helped me make it look metallic and one of a kind. The KaiserCraft paper was a perfect blend with my charm.


Sunday, March 4, 2012

Sweet Treat for Easter


Who doesn't like a little sweet treat, especially on Easter. I created a lollipop cover using CottageCutz Easter Basket Bunny by ScrappingCottage. These covers are so much fun to make and the Easter Bunny really makes it stand out. The matching Peachy Keen stamp set that comes with the die, creates a precious face.
Now to go make 23 more of these for my son's class.

I have enjoyed being on ScrappingCottage / CottageCutz and will miss their team, but look foward to seeing all the beautiful projects the future DT will create.

Saturday, March 3, 2012

FIVE


Happy Weekend everyone.  Today I'm sharing a layout I created with Simple Stories and Unity Stamps entitled FIVE.  I love this photo of my youngest son on his fifth birthday.  He had been sick but was able to get up and blow out his candles on his cake...it was so pitiful.  The colors of this paper collection just screamed to be used with this photo and I love the way it turned out.  I've entered this in the Unity Friends with Flair.

See you tomorrow. 

Friday, March 2, 2012

KaiserCraft These Days 12 x 12 Layout


I really love the new line from KaiserCraft "These Days" .  The vintage feel of the collection is right up my alley.  I love this shot of my sister and I Gini.  I snapped it on Thanksgiving day ...self portrait.  I thought it turned out pretty good considering I was holding the camera in front of me, LOL.


Normally I like to color or treat Kaiser's wooden flourishes, but honestly they blended so well with paper that I didn't need to do anything.  I just let the wood speak for itself.


Thursday, March 1, 2012

Free Cricut Cartridge!!! Starting TODAY

:


Who doesn't love to get FREE things...I know I do.  During the month of March you can get the free Art Philosophy Cricut Cartridge when you sign up to become a Close To My Heart Consultant....

So you say you don't want to do sales...no problem.  Sign up now and get all the goodies below for only $99 (value $285)  plus the Free Cricut Cartridge Bundle (value $99)

ALL FOR ONLY $99

You can also add any or all of the followin on for $40 each


All you have to do is click here...sign up and wait for your goodies to come.  Have more questions?  Feel free to contact me lorileng@bellsouth.net and I'll be happy to answer any questions you might have.

Remember you never have to order anything ever again, however if you would like to start a business or team, I'm the perfect girl for you.  I've had great success with Close To My Heart for the past three years and would love to share my secrets with you. 


Wednesday, February 29, 2012

Heartfelt Creations Hanging Sign


I'll be the first to admit this is not the best photo of this project.  I had to take it at night and as hard as I tried to lighten it up...it just doesn't do the piece justice.  I do love to create girly flowers with Heartfelt stamps...it's super easy. 


I encourage you to hop over to Heartfelt's Blog and see the rest of the Design Team Projects...they are so beautiful. 

Monday, February 27, 2012

Start of My Art Journal


OK, so I've decided to jump on the band wagon and start an art journal.  I love the idea of just creating and seeing what you can come up with...some of them loving and maybe some of them not.  I'm happy to report my first page...I love.  I've also choosen to make it a journal not just about my art but about me and where I am in my life.  Heck I can't think of anything more personal than art.


I can't tell you how many Unity Stamps I used on this project...I just kept reaching for them, each one echoing my feelings more and more....


So let me know if you have an art journal...I'd love to hear about yours.


Handmade Flower Tutorial

Happy Monday Morning.  I'm so excited to share a great new tutorial with you using Paperclay® and Prickley Pear Stamps.   I'm going to show you how easy it is to create these elegant flower/blooms.


First step is to gather the supplies above, Don't forget your favorite Prickley Pear Stamp Sentiment!


Roll out a thin sheet of Paperclay® and cut out your flower petal. This is actually a die cut used for making sugar paste flowers and you can find them in many larger craft stores.

Layer two petals and press down with ball tool. This will make the flower cup inward.

Pinch your third petal inward and glue into the center of your flower. This will give that full look in the center of your flowers.

Flower before coloring


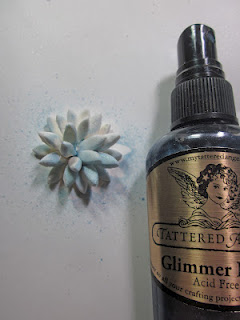
Spray your flower with base coat of glimmer mist.


Take a dry paint brush and lift some fairy dust on the bristles then sprinkle wet flower with fairy dust


Spray again with glimmer mist to make the fairy dust run and blend.


Let dry and you have a beautiful finished flower to add to your projects.  Now stamp your sentiment from Prickely Pear...I used FIND WHAT YOU SEEK and you have a beautiful card in no time...plus it's a one of a kind for sure.